Disclosure: As an Amazon Associate I earn from qualifying purchases. This page may contain affiliate links, which means I may receive a commission if you click a link and purchase something that I have recommended. There is never an additional cost to you.
In our previous posts “What Are The Health Benefits Of Hot Yoga?” we discussed what Hot Yoga is all about, plus its health benefits and other Hot Yoga topics. Lets remind ourselves of some of the benefits of Hot Yoga-
- Less Toxins
- Less Injuries
- Stronger Immune System
- More Flexible Muscles
- Improved Lung Capacity
- Improved Circulation
- Improved Lymphatic System
- Increased Weight Loss
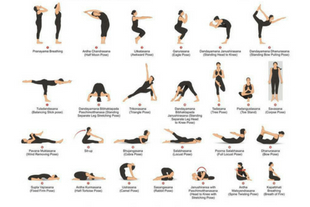
In this post we will be showing the 26 Hot Yoga poses that you will be expected to perform in a normal Hot Yoga class.
1.Standing Deep Breathing (Pranayama)
Why we do it: Deep breathing is one of the most important aspects of yoga.
This yoga pose will:
- Pranayama increases your focus and expands the lungs.
- It enables maximum oxygen to reach your muscles and organs and
- improves blood circulation.
- It will prepare you for the following exercises by easing and calming your mind.
- The breathing energizes and detoxifies your body.
How to do the Standing Deep Breathing Pose:
- Stand straight.
- Keep your spine erect, and legs together.
- Interlock your fingers and place them under your chin and along the arc of your neck.
- Keep your elbows together.
- As you inhale, pull up your arms over your head keeping the hands together.
- Place the heel of one foot against the thigh of the other leg.
- Keep your head straight. Breath deeply.
- Change legs.
- Repeat 3 times
2. Half Moon Pose (Ardha Chandrasana)
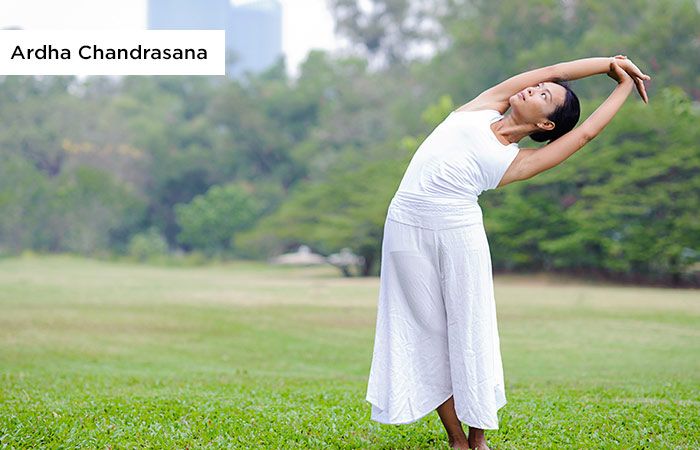
Why we do it: The spine is actually capable of bending backwards just as much as forwards.
This yoga pose will:
- Release frozen shoulders and your spine
- Stretch your hamstrings
- Firm and trim your waistline.
- Invigorate your entire nervous system
- Improve strength in your abdominal muscles, spine and sciatic nerves
- Help recover slipped or ruptured discs
- Strengthen the biceps of your thighs and calves
How to do the half moon pose:
- Stand up straight and lift your arms up.
- Join your palms to form the prayer mudra above your head.
- Don’t bend your elbows.
- Keep your hands straight, flexed, and firm.
- Now, in that position, bend on your right hip, with your torso falling on the right.
- Keep your legs straight while doing this.
- Repeat the same on the left side.
3. Awkward Pose (Utkatasana)
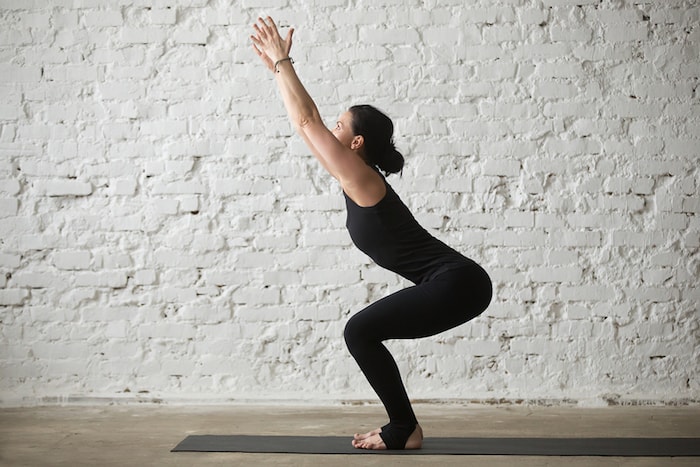
Why we do it: This is a strength posture that works and firms all the muscles in your thighs, calves, hips and upper arms.
This Yoga Pose will:
- Increase blood circulation in your knees and ankle joints
- Relieve rheumatism, arthritis and gout in the legs
- Cure slipped discs and lumbago in the spine.
- Tones and shapes the legs
- Stretches hips, spine and chest muscles.
How to do the Awkward Pose:
- Stand straight and keep your feet arm length apart.
- Stretch your arms forward, with your palms facing downwards.
- Keep your arms straight.
- Now, bend at your knees and push your body down as if you are sitting on an imaginary chair.
- Do not bend your knees beyond your feet.
- Hold the pose.
4. Eagle Pose (Garudasana)
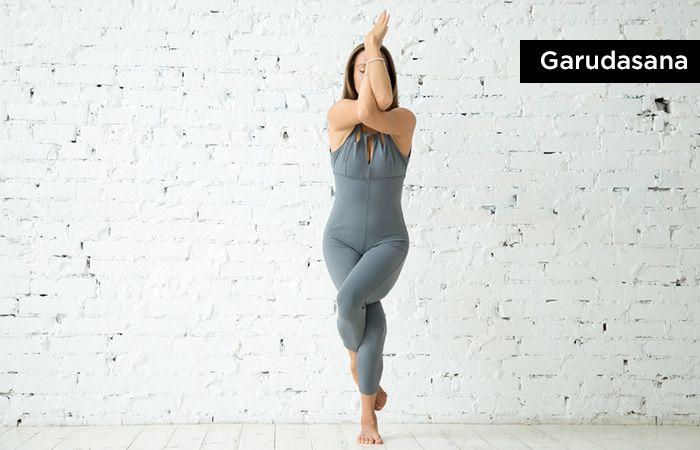
Why we do it: It works all 14 major joints in your body by creating pressure and then releasing it. This allows fresh blood supply to flow. It’s also known as the ‘fertility’ posture, because it massages your reproductive organs.
This yoga pose will:
- Open up the largest joints in your skeletal system.
- Improves the flexibility of your hips, knees, and ankles.
- It enables fresh blood to flow through your kidneys and reproductive organs.
- It also increases your focus and improves balance.
How to do the Eagle Pose:
- Stand up straight.
- Bend your right knee.
- Wrap your left knee over your right knee such that they seem stacked on top of each other.
- Place your left leg on the posterior of your right shin.
- Raise your arms forward to the shoulder level and bend your elbows at a 90-degree angle.
- Wrap your right hand over your left.
- Repeat the same with the other side.
5. Standing Head to knee Pose (Dandayamana-Janushirasana)
Why we do it: This posture develops concentration, patience, and determination.
This yoga pose will:
- Strengthen your abdominal and thigh muscles
- Improve flexibility of the sciatic nerves
- Strengthen your tendons, biceps of the thigh muscles, and hamstrings in your legs.
- improve concentration.
- build mental strength.
How to do the Standing Head to Knee Pose:
- Standing straight with your feet together.
- Form a cup with your palms by interlocking your fingers.
- Bend at your waist and lift your right leg up towards your chest by bending at the knees and cupping your palms around the sole of your foot.
- Slowly straighten your right leg, taking your hands with it.
- Bend your torso further, making your chest touch the knee of your right leg.
- You must also bend your elbows slightly to accommodate this stance.
- Hold the pose.
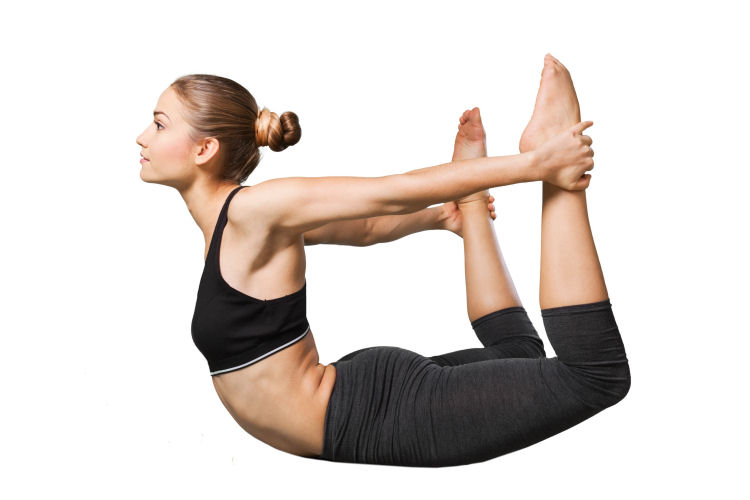
6. Standing Bow Pose (Dandayamana-Dhanurasana)
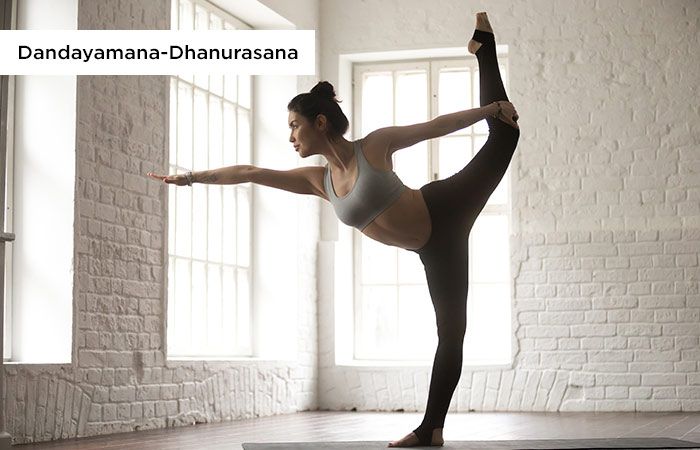
Why we do it: It increases your circulation to the heart and lungs.
This yoga pose will:
- Regulate menstrual cycles
- Boosts the elasticity of the spine
- Help balance out your body energies
- Help with lower back pain.
How to do the Standing Bow Pose:
- Stand straight.
- Lift one of your legs with your hand from the inside at the ankle.
- Stretch the other arm out to the sky with the palms facing forward.
- Slowly extend the leg you lifted upwards.
- Make sure your torso is going slightly forward while doing so.
- Keep your hips and the foot of the leg on the ground in a straight line.
- Kick the other leg further up till you can with the arm of the hand holding the foot stretching along with it.
- As you stretch higher, your upper body should bend more forward.
7. Balancing Stick Pose (Tuladandasana)
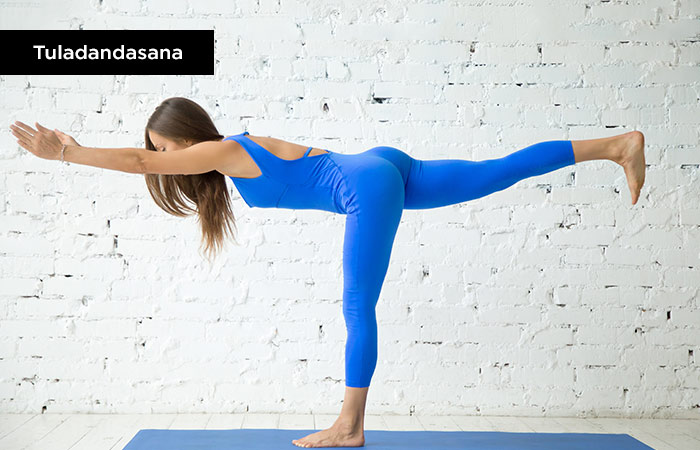
Why we do it: To firm hips, buttocks, and upper thighs. It improves your flexibility, strength and muscle tone in your shoulders, upper arms, spine and hip joints.
This yoga pose will:
- Improve circulation
- Strengthens your heart muscle
- Clear blockages of the arteries
- Stretch the capacity of your lungs.
How to do the Balancing Stick Pose:
- Stand straight and raise your arms to the sky.
- Clasp your hands, leaving your index fingers pointing to the sky.
- Now, lift your left foot off the floor while keeping your spine straight.
- Take your left leg further up.
- You will form a ‘T’ with your outstretched left leg and your arms.
- Hold the pose.
8. Standing Separate Leg Stretching Pose (Dandayamana-Bibhaktapada-Paschimotthanasana)
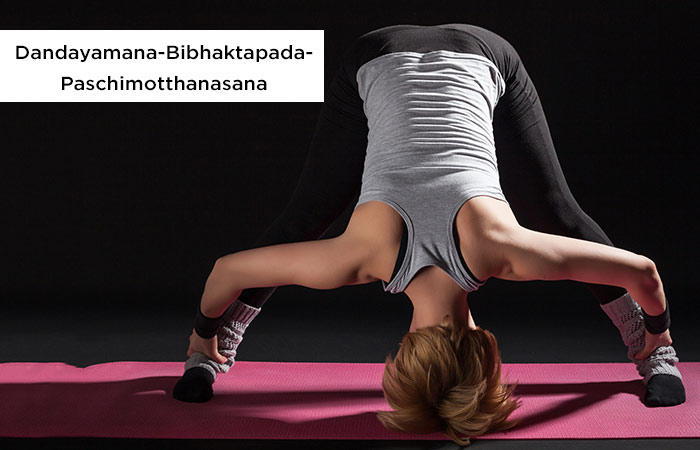
Why we do it: It helps relieve depression and memory loss.
This yoga pose will:
- Increase circulation to your brain and adrenal glands
- Open your hamstrings
- Lengthen your spine
- Relieves constipation.
How to do the Standing Separate Leg Stretching Pose:
- Stand straight.
- Take a big step to the right with your right leg.
- Stretch your leg to the right as wide as possible.
- Stretch your arms on their respective sides and bend forward towards the ground and between the legs.
- Reach your hands towards your feet and clasp them around the ankles.
- Use that grip to push your torso further down till your head touches the ground.
- Keep your arms, legs, and spine straight.
- Hold the pose.
9. Triangle Pose (Trikonasana)

Why we do it: This posture is a marriage between the heart and the lungs which changes chemical imbalances in the system. It works 100% of your body; muscles, joints, nerves and tissues.
This yoga pose will:
- Strengthen your quads, calves and hamstrings
- Ease hip and back pain
- Helps to regulate your menstrual cycle.
- It cures anxiety.
- improves digestion and coordination between the heart and lungs.
How to do the Triangle Pose:
- Stand straight with your feet arm distance apart.
- Keep your waist straight and bend towards the right.
- Lift your left hand up and let your right hand touch the ground, forming a straight line.
- Your right hand should touch the tips of your right toes, with the palm facing outward.
- Keep your right foot facing towards the right.
- Bend your right knee as much as you can and stretch out your left leg.
- The legs should be flexed and taut.
- Turn your head left and look up at your left hand.
- Hold the pose.
10. Standing Separate Head To Knee Pose (Dandayamana-Bibhaktapada-Janushirasana)
Why we do it: It helps to maintain your blood sugar levels and causes compression of the pancreas and kidney which acts as a cleanser.
This yoga pose will:
- Create a marriage between your pineal and thyroid glands
- Benefit your muscular, skeletal, endocrine, digestive and reproductive systems
- Alleviates depression and anxiety
- Help with colds, sinus problems, and migraines.
How to do the Standing Separate Head To Knee Pose:
- Stand straight with your feet together.
- Raise your arms overhead and join your hands together in a firm clasp.
- Move your right leg towards the right, about two to three feet distant from the left leg.
- Turn your right foot towards the right.
- Now, tuck your chin into your chest and bend your torso towards your right leg till your head touches your right knee.
- Make sure your legs and hands are straight while you do this.
- Hold the pose.
- Repeat on the other side.
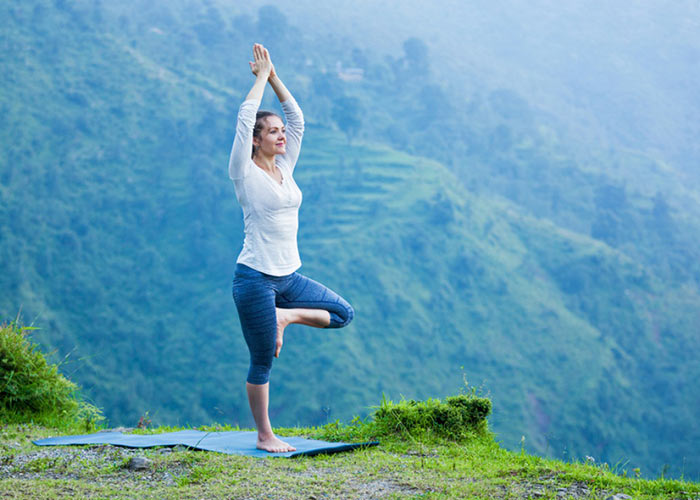
11. Tree Pose (Vrikshasana)
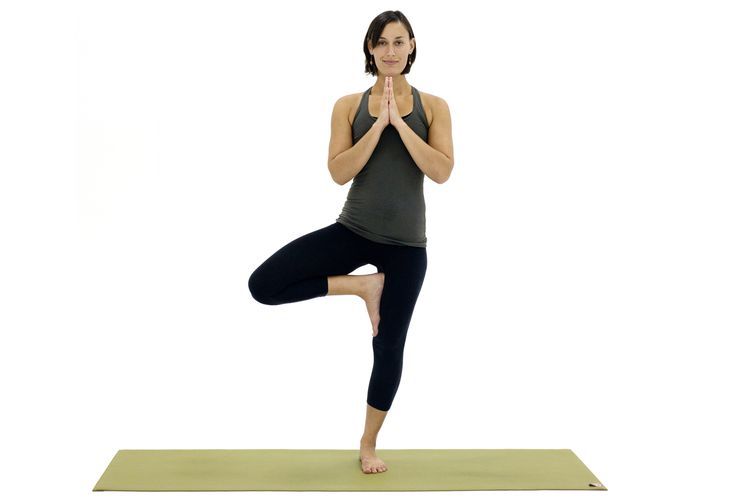
Why we do it: This pose facilitates hip and knee mobility and is excellent for posture and balance. It also helps with rheumatism and circulatory disorders.
This yoga pose will:
- Increases the flexibility of your hip joints, knees, and ankles.
- Improves your posture and balance.
- Strengthens your eyes and shoulders and reduces flat feet. It also increases your patience.
- Prevent hernias and aids neuromuscular co-ordinations.
How to do the Tree Pose:
- Stand up straight with your feet together.
- Keep your arms along the sides of your body.
- Get your palms together in a prayer mudra and place them in front of your chest.
- Raise your right foot.
- Bend it at the knee and place it on the upper thigh of your left leg near the root of the left thigh.
- Square your shoulders and keep your left leg straight.
- Hold the pose.
12. Toe Stand Pose (Padangustasana)
Why we do it: To create balance within your body and mind, and to challenge your mental concentration.
This yoga pose will:
- It increases your focus and improves your posture.
- It cures hemorrhoid problems and develops mental strength.
- It strengthens your joints, abdominal muscles, hips, ankles, and toes.
- Strengthens and opens up your knees.
- The pose will also keep you calm and balanced.
How to do the Toe Stand Pose:
- Stand straight with your arms by the side.
- Bend your right knee towards your chest.
- Bring your right foot to rest on your left knee.
- Make sure the sole of your right foot is facing upwards.
- Now, bend down on your standing left leg and bring your buttocks to rest on the heel of your left foot.
- The thigh of your left leg should be parallel to the ground.
- Bring your hands together in the prayer mudra and place them in front of your chest.
- Hold the pose.
13. The Corpse Pose (Savasana)
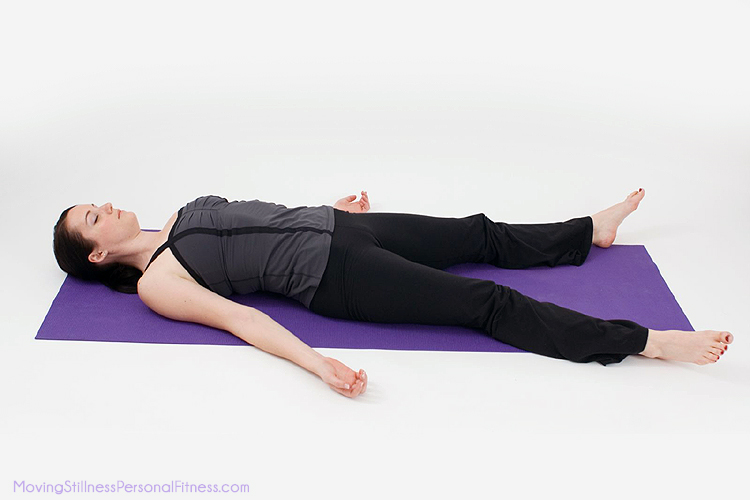
Why we do it: This pose slows your heart rate, reduces blood pressure, teaches complete relaxation and stillness. So returns your cardiovascular circulation to normal.
This yoga pose will:
- Helps in curing constipation, diabetes, and asthma.
- Relaxes and cleanses your body internally.
- Cures insomnia and relaxes your muscles.
- Also improves your mental health and concentration and stimulates blood circulation.
- Releases stress, depression, tension, and fatigue.
How to do the Corpse Pose:
- Lie down on your back.
- Keep your legs slightly apart.
- Place your arms along both the sides of your body.
- Let your palms face upwards.
- Relax. Close your eyes and breathe deeply through your nose.
- Consciously relax your body from head to toe as you breathe.
- Hold the pose till you feel completely relaxed.
14. Wind Removing Pose (Pavanamuktasana)
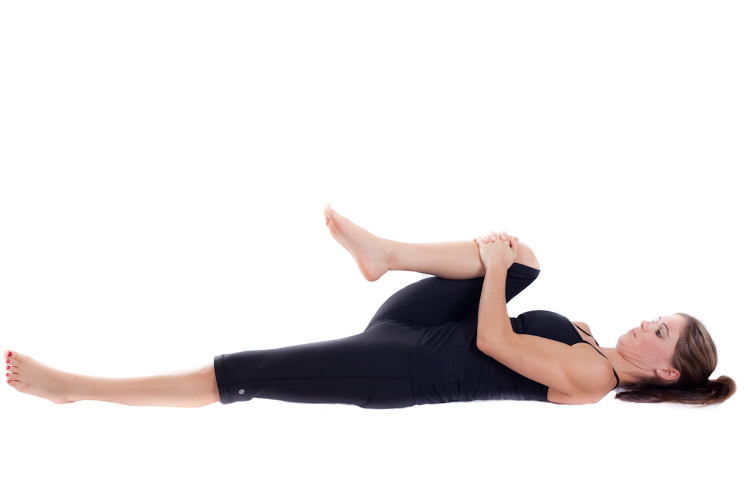
Why we do it: It can help to prevent constipation and irritable bowel syndrome. Also massages your colon.
This yoga pose will:
- Stimulates the liver, intestines and spleen
- Relieve lower back pain.
- Help to normalise your production of stomach acid
- Improve flexibility in your hip joints
How to do the Wind Removing Pose:
- Lie down on your back with your feet together and arms placed along the sides of your body.
- Clasp your hands and wrap them around your right knee.
- Bring it towards your chest and press your thigh on the abdomen.
- Keep your neck and left leg straight.
- Square your shoulders.
- Hold the pose.
15. Sit Up Pose (Padahastasana)

Why we do it: To strengthen and tighten the abdomen. Open mouth exhalation also stimulates your diaphragm and eliminates toxins from lungs.
This yoga pose will:
- Stimulates the kidneys and pancreas.
- Firms your lower body and improves blood circulation in the legs.
- Increases your flexibility and stretches your spine.
- Stretches your shoulders and hamstrings and strengthens the biceps and calf muscles.
How to do the Sit Up Pose:
- Sit down on your buttocks with your legs stretched out in front of your torso.
- Leave your arms hanging on both sides of your torso.
- Keep your back erect and feet together.
- Bend your torso towards your knees and place your head on them.
- Reach for the toes with your hands and clasp them.
- Flex your arms at the elbows and place them on the ground beside your calf muscles on both the sides.
16. Cobra Pose (Bhujangasana)
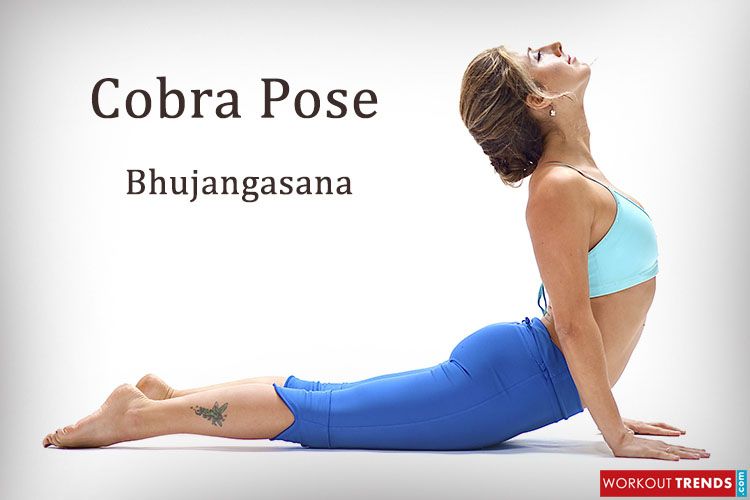
Why we do it: To concentrate on strengthening the lower spine.
This yoga pose will:
- Improves your appetite and digestion.
- Relieve menstrual disorders and regulates blood pressure.
- Enhance the functioning of your liver and spleen and makes your spine stronger and more flexible.
- Balances weight by regulating your metabolism.
How to do the Cobra Pose:
- Lie down on your stomach.
- Keep your toes together, and your arms gently placed on both the sides of your torso.
- Place your palms on both the sides near your chest, facing downwards and gently pressing into the ground.
- Now, apply pressure on your palms and lift your head, chest, and stomach off the floor.
- As you do this, bend your arms a little at the elbows.
- Square your shoulders and keep them away from your ears.
- Hold the pose.
17. Locust Pose (Salabhasana)
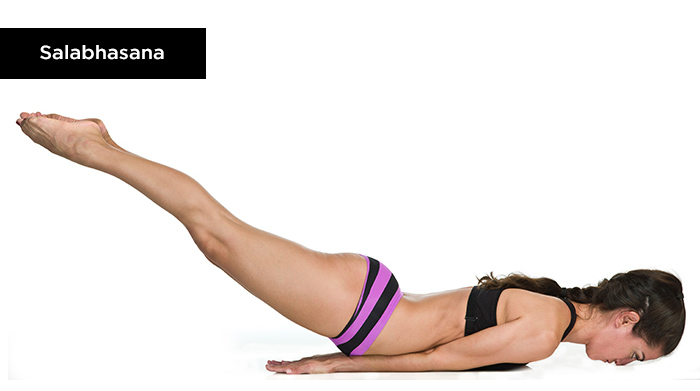
Why we do it: To strengthen and lengthen the upper one-third of the spine. The isometric pressure promotes muscle power to and all over the spine and balances strength on both sides of the body.
This yoga pose will:
- Strengthens your upper spine and relieves tennis elbow.
- Work perfectly for slipped discs and sciatica.
- Firms your buttocks and hips and encourages perseverance.
- Helps in removing varicose veins on legs.
How to do the Locust Pose:
- Lie down on your stomach, keeping your chin on the floor.
- Let your heels touch each other.
- Now, snug your arms under your abdomen.
- Your palms should be facing downward and fingers spread and pointing towards your knees.
- Lift your right and left legs separately.
- Release your chin and place your mouth on the ground as if you are kissing it.
- Get your legs together, apply pressure on your hands, and lift both your legs as if they are one.
- Hold the pose.
18. Full Locust Pose (Poorna Salabhasana)
Why we do it: This pose works the middle one-third of the spine. It also helps with high blood pressure and back extension.
This yoga pose will:
- The pose corrects bad posture.
- Prevents lower backache and relieves rheumatism and menstrual problems.
- Good for spondylosis and slipped discs.
- Increases the elasticity of your rib cage and tones your arms, thighs, abdominal muscles, and hips.
How to do the Full Locust Pose:
- Lie flat on your stomach.
- Stretch your arms out at the sides with the palms facing downwards.
- Keep your legs together. Lift your head, chest, and torso off the floor.
- Lift your arms along with them, stretching them outward, with the palms facing down as you do so.
- Lift your legs off the floor.
- Hold the pose.
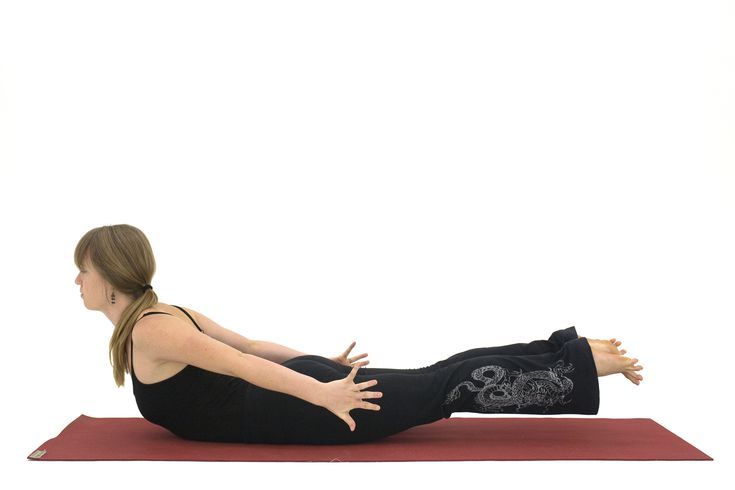
19. Bow Pose (Dhanurasana)
Why we do it: This pose works the entire spine.
This yoga pose will:
- Strengthen and revitalizes your spinal nerves.
- Expand your lungs.
- It treats bronchitis and diabetes and helps the liver, kidneys, and spleen function better.
- Improves the functioning of your large and small intestines, relieves constipation, and improves digestion.
How to do the Bow Pose:
- Lie down on your stomach.
- Keep your arms along the sides of your body.
- Keep your legs hip-width apart.
- Bend your knees and stretch out your arms to hold your ankles.
- Lift your chest and legs off the floor and pull your legs back by applying pressure on your ankles with your hands.
- Look straight and hold the pose.
20. Fixed Firm Pose (Supta Vajrasana)
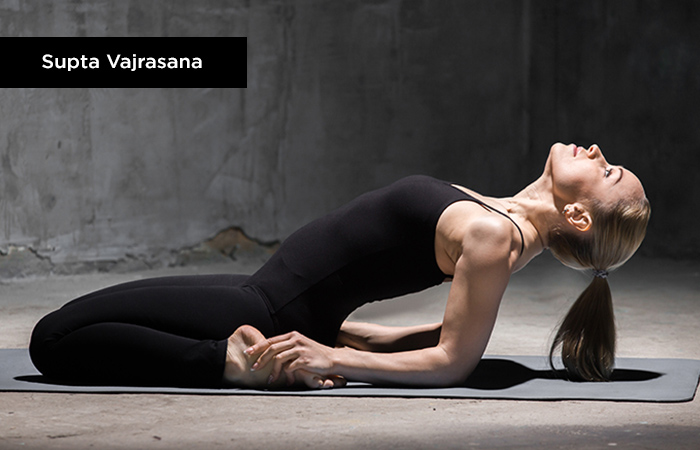
Why we do it: To stretch and strengthens the psoas muscle.
This yoga pose will:
- Relieve lower back pain
- Stretch the knee and ankle joints
- Help to prevent hernias.
- Firm your abdomen and calves
- Slims your thighs
- Help cure sciatica, gout and varicose veins
How to do the Fixed Firm Pose:
- Sit in Vajrasana and place your palms beside your buttocks with your fingers facing forward.
- Bend backward, keeping your right forearm and elbow on the floor and then the left forearm and elbow.
- Bear the weight of your torso on the elbows and look ahead.
- Reach for your toes with your fingers and grasp them.
- Hold the pose.
21. Half Tortoise Pose ( Ardha Kurmasana)

Why we do it: To stretch and lengthen your shoulder and lat muscles.
This yoga pose will:
- Provide maximum relaxation.
- Lengthen your entire spine.
- Help emphysema, asthma, and other respiratory ailments.
- Cure indigestion, constipation, and insomnia.
- Increase blood flow to the brain, bringing mental clarity and better memory.
How to do the Half Tortoise Pose:
- Sit in Vajrasana and lift your arms up towards the sky.
- Bring your palms together and entwine both your thumbs together.
- Keep your arms straight and stretched, with your biceps touching the ears.
- Now, bend down at your waist, bringing your entire torso towards the ground.
- Get your forehead and little fingers to touch the ground.
- Hold the pose.
22. Camel Pose (Ustrasana)
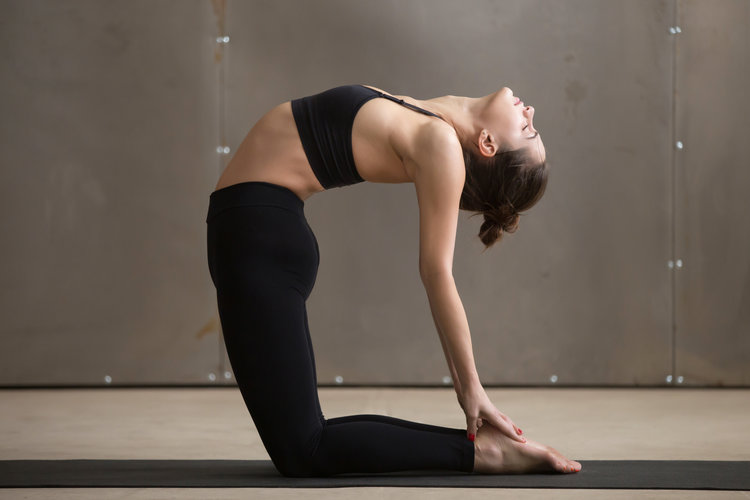
Why we do it: It opens the chest and strengthens muscles of the back and shoulders.
This yoga pose will:
- Produce maximum compression of the spine.
- Improve flexibility in your neck and spine.
- Open your heart chakra, which can often lead to an emotional release.
- Stimulate your entire nervous system.
How to do the Camel Pose:
- Kneel down on a mat and place your hands on your hips.
- Your shoulders and knees should form a straight line, and the soles of your feet should be facing upwards towards the ceiling.
- Bend backward gently and reach for the soles of your feet with your fingers.
- Keep your arms straight and look upwards.
- Hold the pose.
23. Rabbit Pose (Sasankasana)
Why we do it: This is a counter posture to the camel.
This yoga pose will:
- Stretch and lengthen your lower spine.
- Nurture the nervous system by allowing blood to flow to the brain.
- Help to maintain mobility and elasticity of the spine and back muscles.
How to do the Rabbit Pose:
- Sit in the Vajrasana.
- Raise your buttocks off the heels of your foot.
- Leave your arms along the sides of your body and keep your back straight.
- Now, bend forward from your waist, arching your back.
- Place your forehead on the lower thighs, and your arms stretched out backward and reaching out to the soles of your feet.
- Place the thumbs on the ankles.
- The other four fingers should gently touch the soles of your feet.
- Hold the pose.
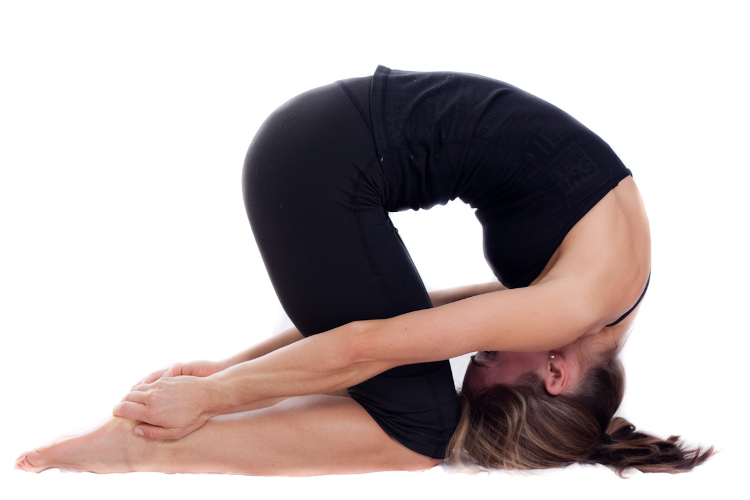
24. Sitting Head To Knee Stretching Pose (Janushirasana-Paschimottanasana)
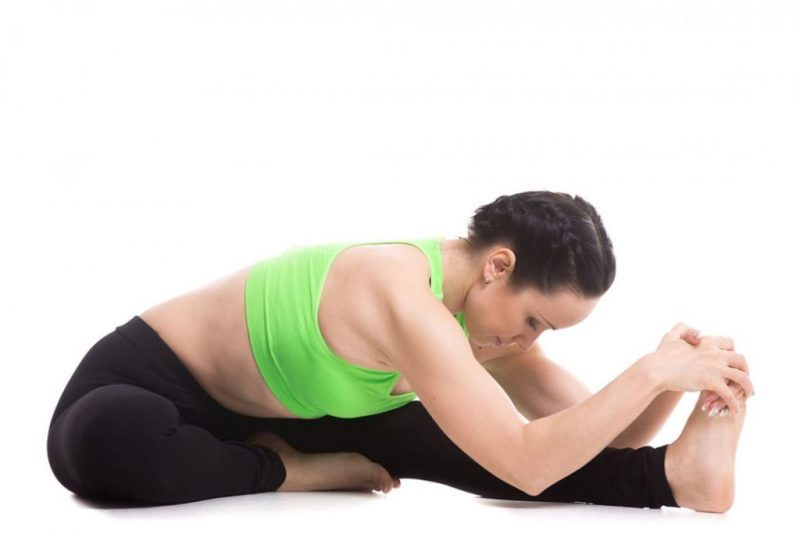
Why we do it: It boosts circulation of blood to your legs and brain.
This yoga pose will:
- Increase flexibility of the spine and ham strings.
- Increase flexibility of the shoulder muscles, hip joint, and the last five vertebrae of the spine.
- Stretch your sciatic nerve and improves its flexibility.
- Increase circulation to the liver, spleen, pancreas, thyroid, thymus and intestines.
- Improve flexibility in your ankles, knees and hip joints.
- Improve digestion.
- Enhance the proper functioning of your kidneys.
- Expand the solar plexus.
How to do the Sitting Head To Knee Stretching Pose:
- Sit down on your buttocks with your legs stretched out in the front.
- Bend your left leg and place the heel near the anus and the rest of the sole on the inner upper right thigh.
- Stretch your arms over your head and bend forward towards your right leg.
- Clasp the big toe of your right foot with both your hands while your hands are bent at the elbows.
- Place the crown of your head on your right knee.
- Hold the pose.
25. Spine Twisting Pose (Ardha Matsyendrasana)

Why we do it: This is the only posture that twists the spine from top to bottom.
This yoga pose will:
- Improve the elasticity of the spine.
- Increase circulation to all the spinal nerves, veins, and tissues.
- Calm the nervous system.
- Relieve lower back pain.
- Help prevent slipped discs, rheumatism of the spine, kyphosis, scoliosis, cervical spondylosis and arthritis.
How to do the Spine Twisting Pose:
- Sit straight on your buttocks.
- Keep your legs stretched out in the front and your feet together.
- Bend your left leg, take it over your right leg, and place your left foot near your right thigh.
- Now, bend your right leg and get it closer to your pelvis.
- The sole of your right foot must press against your left buttock.
- Bend your torso towards the left and keep your gaze over your left shoulder.
- Keep your spine erect.
- Take your left arm behind and place your palm on the back.
- Stretch out your right arm and clasp your right knee with your right hand.
- Hold the pose.
26. Skull Shining Breathing Technique (Kapalbhati Pranayama)
Why we do it: It improves digestion and circulation
This yoga pose will:
- Generates prana.
- Increase the elasticity of the lungs with every forceful exhale.
- Stimulate your digestive system.
- Push out every ounce of carbon dioxide, replacing it with life-giving oxygen.
- Strengthen your abdominal organs and increases circulation to them.
How to do the Skull Shining Breathing Technique:
- Sit down in Sukhasana and place your palms on your knees in the meditation mudra.
- Inhale deeply and slowly through your nose.
- Pull your stomach in towards your back.
- As you relax from this contraction, exhale in an outburst, and follow it up by an automatic inhalation.
- Doing this 20 times counts as one round of Kapalbhati.
- Relax deeply in Sukhasana at the end of each round by closing your eyes and listening to your body.