Disclosure: As an Amazon Associate I earn from qualifying purchases. This page may contain affiliate links, which means I may receive a commission if you click a link and purchase something that I have recommended. There is never an additional cost to you.
In our previous post we discussed What Is Yin Yoga and What Are Its Benefits?
In this post we are looking at Yin Yoga poses. we have selected 10 Yin Yoga Pose that really embrace the Yin Yoga style.
1. Meditation Seat (Sukhasana)
The Meditation Seat or Easy Pose as it is sometimes called, is an ideal pose If you struggle while sitting in difficult meditative yoga poses or experience discomfort. Sukhasana is the simplest meditative posture and hence known as Easy Pose. It is an excellent pose for beginners and for those who have a very stiff body.
The Sanskrit name Sukhasana is derived from two words:
Sukh = Feeling of joy, pleasure or happiness
Asana = Posture or Comfortable seat
How to do the Meditation Seat:
- Sit straight with the legs stretched out in front of the body.
- Bend the left leg and place the left foot beneath right thigh.
- Similarly, bend the right leg and place the right foot beneath left thigh.
- Rest the outer edge of your feet on the floor.
- Adjust the body and legs to get comfortable in the pose.
- The head, neck and spine must be erect (without strain).
- Place the palms on the knees or thighs.
- Keep the shoulder relaxed and elbows a bit bent.
- Close your eyes and relax the whole body, take slow and deep breaths.
- Feel each and every breath moving in and out of the body.
- Practice for a minute or less if you feel discomfort.
- Practice twice by interchanging the position of the legs.
Benefits of Meditation Seat:
- It relaxes your brain.
- It spreads a sense of calm and peace through your mind and body.
- Your chest and collar bones are broadened.
- You will feel all exhaustion, stress, and anxiety leave your being.
- Your body alignment is improved.
- Your back becomes stronger and steadier.
- Practicing this asana helps elongate your spine.
- This asana gives your knees and ankles a good stretch.
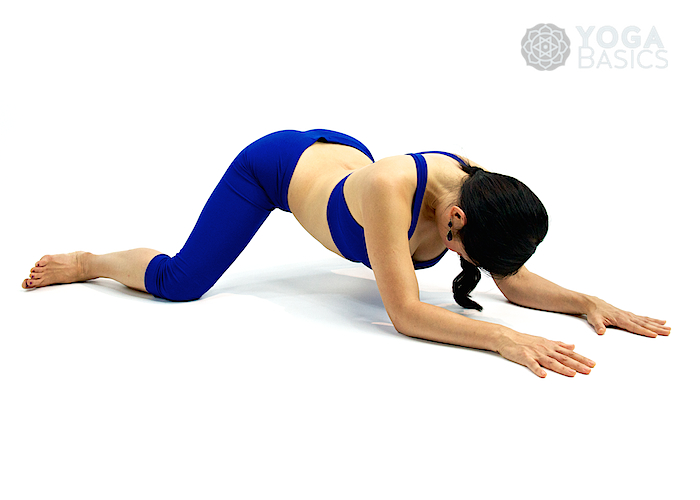
2. Melting Heart (Anahatasana)
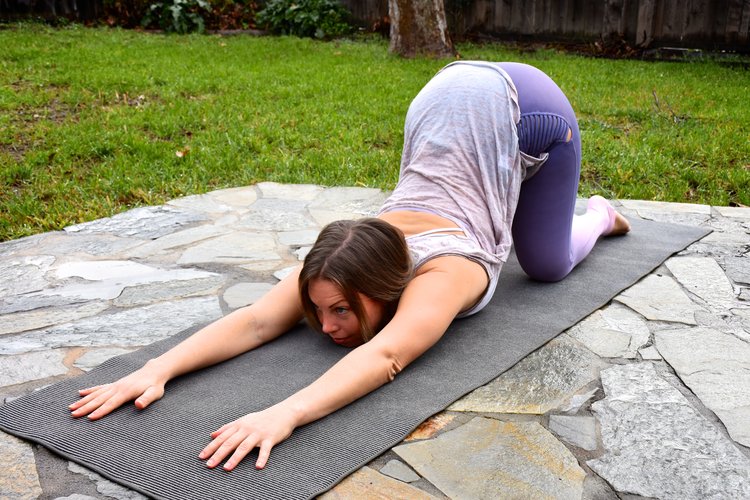
The Melting Heart Pose or Anahatasana (sometimes referred to as Extended Puppy pose), deeply opens the shoulders, pectoral muscles of the chest, thoracic spine, neck and lower back. Heart and lung meridians receive a fresh burst of prana. Try this yoga pose first thing in the morning to set the tone for the day ahead!
How to do the Melting Heart Pose:
- From hands and knees position, melt your heart towards the Earth to the degree that feels appropriate.
- Ultimately your chest can lay on the ground, with the chin tilting up. This will compress and massage the back on the neck and must only be done if comfortable.
- Hold for 3-5 minutes, breathing deeply into the shoulders, neck, spine, chest and lower back.
- Always remember where your attention goes, energy flows and it is important in these more challenging Yin yoga poses to remain focused inwards.
- Observe the emotions rising in this yoga pose. Melting heart is particularly effective in releasing heavy or sad feelings, so you may have a need to cry which will create profound healing.
- By the end of the pose, you will feel joy and lightness.
Benefits of the Melting Heart Pose are:
- Expands the chest and give a soothing effect on the Anahata Anahata chakra is associated with feelings and emotions.
- It can release some our blocked emotions and we can feel free of the burdens of the heart.
- It releases the tensions and creates a sense of well-being in the mind.
- It opens up the chest and is good for respiratory function.
- It can make the spine flexible and improves posture.
- Upper back and the lower back gets a gentle stretch.
- Anahatasana also helps to open up the shoulders.
3. Seal Pose (Yoga Mudra)
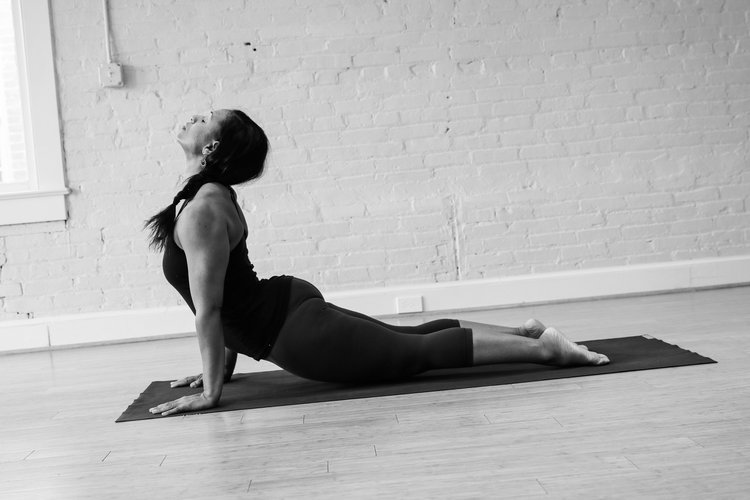
The Seal Pose is used a lot in Yin yoga where poses are held for a few minutes at a time. It creates and maintains a healthy lower back curve – which can be adversely affected by aging and long periods of sitting. Practising the Seal pose can also help ease lower back pain and stiffness.
How to do the Seal Pose:
- To start, place your palms flat on the ground, in front of you.
- Your hands should be in line with your elbows.
- Now, apply a firm pressure and push yourself up, straightening your arms as you go.
- A key thing to note about seal pose is that your hands will be quite some distance from your body.
- You should experience only minimal exertion in keeping your back bent.
- Your arms should only be supporting your upper body, not the rest of you.
- In both cases you will want to hold the pose for some minutes to get the most out of the exercise.
- Of course, if you start to feel pained you should stop.
Benefits of the Seal Pose are:
- Stretches the front of the abdomen
- Opens the chest
- Stimulates the Urinary Bladder and Kidney meridians
- Compresses and stimulates the sacral-lumbar arch
4. Child’s Pose

Balasana is a common beginner’s yoga pose. Quite often used as a resting position in between more difficult poses during a yoga practice. The word “Balasana” comes from the Sanskrit words “bala” (meaning “child”) and “asana” (meaning “pose”). A great favourite and never a doubt in our list of Yin Yoga Poses.
How to do the Child’s Pose:
- Slowly lower yourself so that both knees are on your yoga mat a little wider than your hips (if you need more padding, place a folded blanket beneath your knees). Your shins should be flat on the mat with your feet behind you, soles facing the ceiling.
- Now Sit on your heels.
- Place a bolster (pillow, couch cushion, or rolled blanket) lengthwise between your thighs; exhale and lay forward onto the bolster, turning your head sideways and let the bolster support the full weight of your head.
- Relax your arms to the ground, reaching forward a bit.
- Focus on your breath and close your eyes. As humans, we breathe approximately 22,000 times each day. Use this pose to help you find a deep connection with each breath.
- Midway through the pose, turn your head the other way so that your neck receives an even stretch.
Benefits of the Child’s Pose are:
- This pose helps soothe headaches as it relaxes upper back and neck.
- Calms the brain and helps relieve stress and fatigue.
- Relieves back and neck pain when done with head and torso supported.
- Great for weight loss when practiced regularly.
- Restores balance to the body.
5. Banana Pose (Banasana)
The Banana Pose is a fun way to open your entire side-body, from the top of your ribs to your iliotibial bands. It is an especially nice pose if you have tight IT bands from running or other physical activity.
How to do the Banana Pose:
- Lie on your back with your legs together and straight on the floor, reach the arms overhead and clasp your hands or elbows.
- With your buttocks firmly glued to the earth, move your feet and upper body to the right.
- Arch like a nice, ripe banana.
- Be careful not to twist or roll your hips off the floor. Find your first edge.
- When your body opens more, move both feet further to the right and pull your upper body further to the right, as well.
- Keep playing this edge.
- Don’t forget to do both sides!
- When your feet are as far to the side as you can get them, try crossing the ankles. Most students feel the greatest stretch by crossing the outside ankle over the inner ankle, but some feel more benefit crossing the other way.
- If you feel any tingling in the hands, trying supporting the arms with a bolster, or rest the arms across the chest.
- Hold for 3-5 minutes.
- Coming Out of the Pose, Simply move your legs back to straight and bring your arms down
Benefits of the Banana Pose are:
- A delicious way to stretch the whole side of the body
- Works the spine in a lateral flexion (side bend) from the iliotibial (IT) band to the tops of the side rib cage
- Stretches the oblique stomach muscles and the side intercostal muscles between the ribs
- We can even get into the arm pit and get a nice stretch there
6. Downward Dog Pose (Adho Mukha Svanasana)
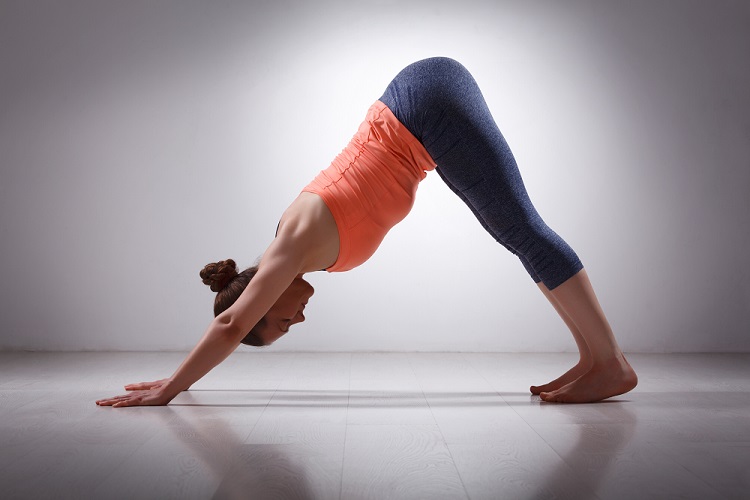
This helps by stretching the muscles in the hamstring and lower back, releasing pressure on the Sciatic nerve in the process.
How to do the Downward Dog Pose:
- Stand on four limbs, such that your body forms a table-like structure.
- Exhale and gently lift your hips and straighten your elbows and knees. You need to ensure your body forms an inverted ‘V’.
- Your hands should be in line with your shoulders, and your feet in line with your hips. Make sure that your toes point outwards.
- Now, press your hands into the ground and lengthen your neck. Your ears should touch your inner arms, and you should turn your gaze to your navel.
- Hold for a few seconds, and then, bend your knees and return to the table position.
Benefits of the Downward Facing Dog are:
- Decrease in back pain by strengthening the entire back and shoulder girdle
- Elongated shoulders and shoulder-blade area
- Stronger hands, wrists, low-back, hamstrings, calves and Achilles tendon
- Deepened respiration
- Decreased anxiety
- Decrease in tension and headaches by elongating the cervical spine and neck and relaxing the head
- Increased full-body circulation
7. Caterpillar Pose
The Caterpillar Pose is one of the Yin Yoga style Poses. It benefits not just with the spine and the abdomen, but works on the deeper tissues of the back and the abdomen. These deeper tissues or tendons can be worked at, only when one holds a yoga pose for a longer duration. And given that Caterpillar Pose is a simple seated yoga pose, the deeper tendons and the tissues around the entire spine and the abdominal area are stretched and compressed simultaneously. The Caterpillar Pose is an adjusted version of the original Hatha Yoga Pose – Paschimottanasana (Seated Forward Bend Pose).
How to do the Caterpillar Pose:
- Coming to sit on your bottom with your legs out straight,
- Make yourself comfortable before putting a slight bend in your knees and folding your body forward.
- Rather than reaching all the way forward to your toes, start rolling down from your head and aim to get your chest on your thighs or rest your head on your knees.
- You should start to feel a nice rippling stretching sensation across your upper back.
- Stay here for 10 deep breaths.
Benefits of the Caterpillar Pose are:
- Stresses the ligaments along the back of the spine
- Compresses the stomach organs, which helps strengthen the organs of digestion
- Stimulates the kidneys
- Since the heart is below the spine, the heart is massaged
- Helps to cure impotency and leads to sex control [1]
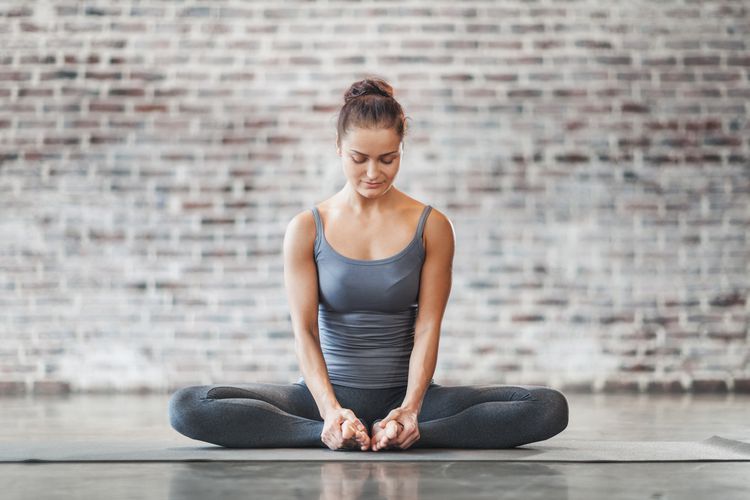
8. Butterfly Pose (Titli Asana)
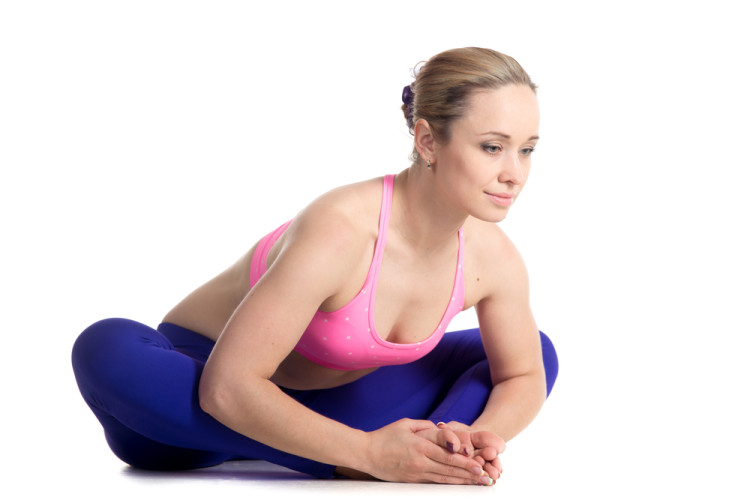
Yin Butterfly, or Passive Butterfly, is a wonderful grounding posture. It is a relatively accessible asana, especially with the use of props if necessary. This pose can be a great way to start your Yin yoga practice or to prep yourself for seated meditation.
It can also be a fab way to start the day — to ease out any tension in the neck from a long night’s sleep and to give a general stretch to the whole spine.
How to do the Yin Butterfly Pose:
- Begin by sitting in the Padmasana (Lotus Pose).
- Move your legs in order that the soles of your feet are touching one another. Your knees ought to be bent.
- Try to position your feet as near your pubic area as possible, in different words, attempt to pull your heels inwards.
- Grasp your feet together along with your hands and keep your spine straight as much as possible.
- Now breathe in (Inhale) and place a hand on both knees.
- Breathe out (exhale) and move your knees up and down till your knees touch the ground. (If you are not able to touch your knees to the ground during the process, in that case only move your knee up and down and avoid over exerting. Push down your knees as much you can).
- Breathe in and permit your knees to come back up again.
- Breathe out and repeat this process fifteen to twenty times.
- You’ll speed up the lowering and raising of the thighs to further relax the muscles.
Benefits of the Yin Butterfly Pose are:
- Useful to the kidneys, bladder, endocrine gland, and ovaries.
- Helps to open up the hips and thighs and improves flexibility.
- A great stretch for relieving stress and tiredness.
- It stimulates the reproductive and digestive organs.
- Helpful for girls throughout menstruation because it helps to alleviate a number of the discomfort and pain related to menstruating.
- Very useful for girls after menopause.
- Good for pregnant ladies.
- Best exercise for relaxing and stretching the aching thighs.
- Regular practice of this posture will facilitate in easing the pain related to natural childbirth.
9. Knees to Chest (Apanasana)
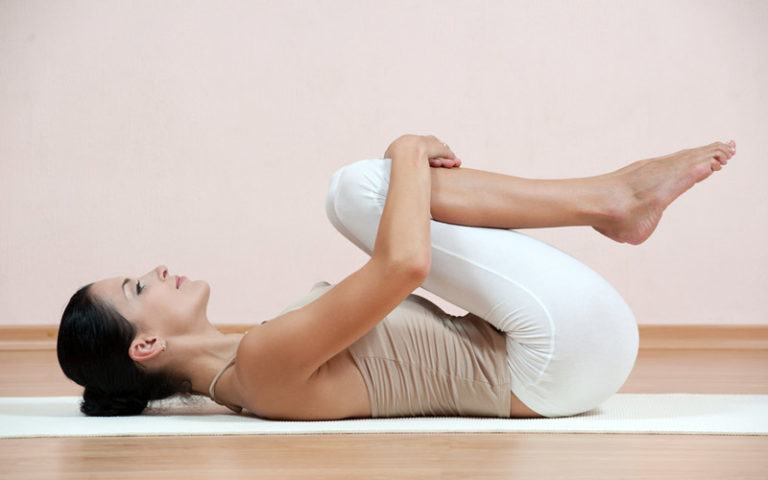
Relieves and warms up the muscles of the lower back, thereby releasing pressure on the sciatic nerve.
How to do the Knees to Chest Pose:
- Lie down on your back.
- Check you are relaxed and symmetrical. Support the head with a blanket or pillow if preferred.
- Tune into the natural breath moving in and out of the nostrils. Breathe freely and naturally.
- With your knees and feet hip-width apart, use the hands to gently bring the knees toward the chest as you breathe in. (Hands can either hold the knees, or the back of the thighs, whichever feels right.)
- Keep your head and shoulders resting comfortably on the floor. Draw the knees in only as far as is comfortable, while keeping the shoulders relaxed, broad and grounded.
- When you are ready to exhale, straighten the arms as you guide the knees away from you.
- Repeat 3-5 rounds, moving with the breath; Breathe in, knees away, breathe out, knees in toward the belly.
- When you are ready to come out of apanasana, roll out to the side, press yourself up to a seated position, and observe how you feel.
Benefits of Knees to Chest Pose are:
- Stretches and stabilizes the pelvis and low back
- Can reduce lower back pain.
- Reduces excessive anger, excitement, anxiety.
- Reduces high blood pressure.
- Helps with muscle guarding, hyperlordosis, sciatic nerve impingement muscle spasm, spinal stenosis, and disc herniation.
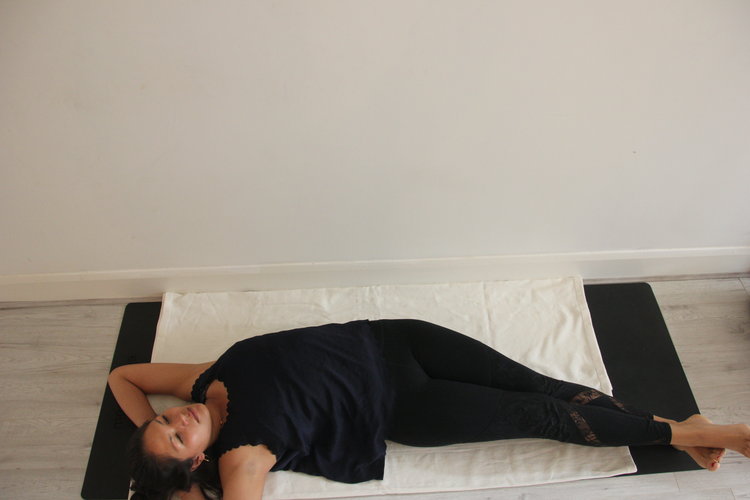
10. Corpse Pose (Shavasana)
The Corpse Pose is usually practiced at the end of a long hard session, this reclining posture doesn’t always need props, but some people are more comfortable resting on a bolster with a pillow under the head. Take your time with this one – it’s extremely relaxing. One of the easiest but under-estimated Restorative Yoga Poses for beginners to undertake!
How to do the Corps Pose-
- Place a blanket lengthwise along the length of your sticky mat.
- Lie Down on your back and stretch the legs in Supta Tadasana. See that you are in the center of sticky mat.
Adjust the shoulders down your back as you did in Supta Padangustasana. - Allow your two feet to fall apart from one another, relaxing your leg muscles.
- Turn your upper arms from the inside out and place the arms equidistantly about 6 inches away from your body. The palms are turned up towards the ceiling.
- Relax every muscle in your body from the tip of your toes to the top of your head.
- Consciously relax the body and in so doing, quiet the mind and move into a deep relaxation for 15 minutes a day, if possible.
Benefits of the Corpse Pose are:
- Shavasana relaxes your whole body.
- Releases stress, fatigue, depression and tension.
- Improves concentration.
- Cures insomnia.
- Relaxes your muscles.
- Calms the mind and improves mental health.
- Excellent asana for stimulating blood circulation.
- Beneficial for those suffering from neurological problem, asthma, constipation, diabetes, indigestion.
- This posture brings a deep, meditative state of rest, which may help in the repair of tissues and cells, and in releasing stress. It also gives time for the yoga workout to sink in at a deeper level.
- This posture leaves you in a state of rejuvenation. It is the perfect way to end a yoga session, particularly if it has been a fast-paced one.
- It helps reduce blood pressure, anxiety, and insomnia.
- This is an excellent way to ground the body and reduce the Vata dosha(imbalance of the air element) in the body.